Image
Summary
Validates and stores a digital image.Properties
| Name | Internal name | Searchable | Information collector |
|---|---|---|---|
| Image | ezimage | No. | No. |
Description
This datatype allows the storage of digital images. It is capable of handling virtually any image type. The maximum allowed file size is determined by the "Max file size" class attribute edit parameter and the "upload_max_filesize" directive in the main PHP configuration file ("php.ini"). The following screenshot shows the class attribute edit interface for this datatype.

Class attribute edit interface for the "Image" datatype.
Max file size
The "Max file size" parameter makes it possible to set the highest size (in megabytes) that the system will allow. By default, this parameters is zero, which means that eZ Publish will not do any size checking when image files are uploaded. In the example above, the "Max file size" parameter is set to 16 MB, which means that the object edit interface will not allow the upload of images that are larger than 16 megabytes. However, if the value of the "upload_max_filesize" PHP setting is lower than 16 megabytes, the underlying system will cancel the upload.
Object attribute edit interface
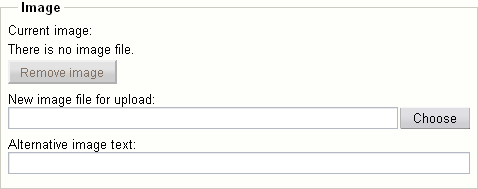
The following screenshot shows the object attribute edit interface when an attribute using this datatype does not contain an image.
Object attribute edit interface for the "Image" datatype.
The following screenshot shows the object attribute edit interface when an attribute using this datatype contains an actual image. The interface reveals the image itself, the name of the file that was uploaded ("dj_cat.jpg"), the MIME type ("image/jpeg") and the size (29.02 kB).

Object attribute edit interface for the "Image" datatype.
Storage
The uploaded images are stored on the filesystem. The main reason for this is because the filesystem is much faster than the database when it comes to the storage and retrieval of large data chunks. Having the images on the filesystem allows the webserver to serve them directly without the need of going through the database. In addition, this technique makes it easier to use external tools to manipulate the images and it dramatically decreases the size of the database.
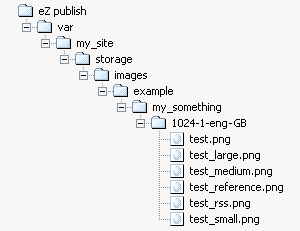
All images uploaded through an attribute that makes use of the image datatype will be stored below "storage/images" within the directory specified by the "VarDir" directive in a configuration override for "site.ini". A directory structure is generated for each object that stores an image. The structure will be an exact copy of the actual node path (consisting of the object names) from the root to the main node that references the object which contains images. The following illustration shows the path to a directory on the filesystem in which the different images of an object are stored.

Example of image path on the filesystem.
In the example above, an image has been stored by an object called "My Something". The main node of this object is a child of a node called "Example". The var directory used by the siteaccess is "var/my_site". The images stored by the "My Something" object will be located in this directory. For each image, version and translation, a new directory will be created. The following illustration shows the naming convention of the directories under which the actual images are stored.

Example of an image subdirectory.
The example above shows a directory for an image that has been stored by the 1024th object attribute. The image belongs to the British translation for the eight version of the content object. The following illustration shows a complete directory structure with actual image files.
Complete directory structure with uploaded image and generated variations.
As the illustration indicates, the image stored by the 1024th attribute (that belongs to the "My Something" object) is represented by multiple files. The original image is "test.png", the rest of the images are the different image variations.
Image variations
With the help of an external application (ImageMagick) or the PHP image library (GD), eZ Publish is capable of generating different variations of an uploaded image. This feature is typically useful when there is a need to show the same image in different ways (for example different sizes). The image variations are controlled by different configuration directives in image.ini. The following table shows the default image variations.
| Variation | Width | Height |
|---|---|---|
| reference |
max 600 pixels |
max 600 pixels |
| small |
max 100 pixels |
max 100 pixels |
| medium |
max 200 pixels |
max 200 pixels |
| large |
max 300 pixels |
max 300 pixels |
| rss |
max 88 pixels |
max 31 pixels |
When an image variation is created (and the default settings are used), eZ Publish will generate a reference image using the file that was uploaded. The reference image is then used to generate the different image variations (small, medium, large and rss) on-demand using the constraints specified in the table above. The generated variations will be cached on the filesystem.
Depending on the image system used, eZ Publish is capable of generating image variations that consist of much more than just scaling. For example, it is possible to generate sharpened grayscale images for the thumbnails of a photo album. Please refer to the documentation of the image.ini configuration file for more information about the different possibilities.
Raw output
The ".content" of an ezcontentobjectattribute object using this datatype returns an ezimagealiashandler object.
Balazs Halasy (21/02/2005 2:39 pm)
Svitlana Shatokhina (16/03/2007 9:36 am)
Comments