The setup wizard
This section contains a comprehensive guide through the web based setup wizard of eZ Publish. The setup wizard is designed to ease the initial configuration of the system. It can be started using a web browser when the necessary installation steps (described in the previous sections) are completed. The setup wizard will automatically start the first time the "index.php" file (located in the root of the eZ Publish directory) is accessed/browsed.
The setup wizard does not store or modify any data before the final step; thus, it can be safely restarted by reloading the URL containing only the "index.php" part. The back button (located at the bottom) can be used to jump back to previous steps in order to modify settings. A typical setup cycle consists of 12 steps:
- Welcome page
- System check
- Outgoing E-mail
- Database choice (optional)
- Database initialization
- Language support
- Site selection
- Access method
- Site details
- Site security
- Site registration
- Finish
Please note that some of the steps will be omitted when an eZ Publish bundle is being installed.
Welcome page

Step 1: Welcome page
This is the initial page of the setup wizard. On this step the wizard checks the system configuration and displays a note if it is not optimal (in this case, an additional button called "Finetune" will be available at the bottom of the page).
After you click "Finetune" (if available), the wizard will load the "System finetuning" page, which contains information about configuration issues. The following screenshot shows an example of this page.

System finetuning
After you click "Next", the wizard will either load the "System check" page (if some critical issues need to be fixed) or the "Outgoing E-mail" page (if everything is okay).
System check

Step 2: Issues
This page usually appears if critical issues/problems are detected. The setup wizard will display information about the issues that need to be fixed and suggestions describing how they can be fixed.
Issues
There may be several issues/problems. A suggestion to each problem is presented below the description of the problem itself. The setup wizard will probably suggest the execution of miscellaneous shell commands (in order to fix ownerships, permissions, etc.). These commands must be executed using a system shell. Simply copy the commands from the browser window and paste them into an open shell. The setup wizard will run the system check again when the "Next" button is clicked. The "System check" page will keep reappearing until all issues have been fixed (or ignored, see the next section). Once everything is okay, the setup wizard will display the next step.
Ignoring tests
Some issues/problems may be ignored using a checkbox labelled "Ignore this test". However, it is recommended to fix all issues rather than ignoring them.
Outgoing E-mail

Step 3: Outgoing E-mail
eZ Publish uses E-mail to send out miscellaneous notices. This step is used to configure how eZ Publish delivers outgoing E-mail. There are two options:
- Direct delivery through sendmail (must be available on the server)
- Indirect delivery using an SMTP (Simple Mail Transfer Protocol) relay server
On Linux/UNIX: try to use sendmail; use SMTP if sendmail is unavailable. On Windows: use the SMTP setting.
Sendmail
Mail is delivered directly using the sendmail transfer agent. The agent must be running on the same host as the webserver is running on. The sendmail binary is usually available on most Linux/UNIX systems. If sendmail is not available then SMTP should be used.
SMTP
Mail is delivered through an SMTP server. At the minimum, the hostname of the SMTP server must be specified.
Database type

Step 4: Database choice
The setup will automatically detect database support that has been made available for the PHP scripting engine. If both MySQL and PostgreSQL is supported, the database choice dialog will appear. If PHP only is setup only to support one type of database, eZ Publish will automatically use it and thus the database choice dialog will not be displayed.
Database initialization

Step 5: Database initialization
Information about the hostname of the server running the database engine, and a username/password combination needs to be provided. When clicking "Next" and if MySQL is used, the setup wizard will attempt to connect to the database. The setup will only continue if it is able to connect to the specified MySQL server with the specified username/password combination. PostgreSQL parameters are tested at a later stage during the setup wizard.
Language support

Step 6: Language support
This step allows the user to choose a language configuration for the site that is being installed. The setup wizard automatically pre-selects one of the languages according to your browser's language settings. Use the radio buttons to choose the default language (required), and the checkboxes to choose the additional languages (optional). All the selected languages will be added to the system and put on the list of prioritized languages. You will be able to use any of these languages for creating and translating your content after the setup wizard is finished.
Please note that choosing the default language at this step will determine default language, system locale and the most prioritized language for your site. If you select for example "German" as default language, then both locale and default language will be set to "ger-DE", your administration interface will be translated into German, and this language will be recorded as the most prioritized one for your site. Languages can be reconfigured at any time (even when a site is up and running) using the administration interface.
If the "Enable Unicode setup" checkbox in the bottom is selected then the site will be created using UTF-8 as character set. In this case, the database should also be created using this character set.
Note that in order to use UTF-8, you must be running MySQL 4.1 or later as previous versions only support the ISO character set. PostgreSQL also fully supports UTF-8.
Site selection
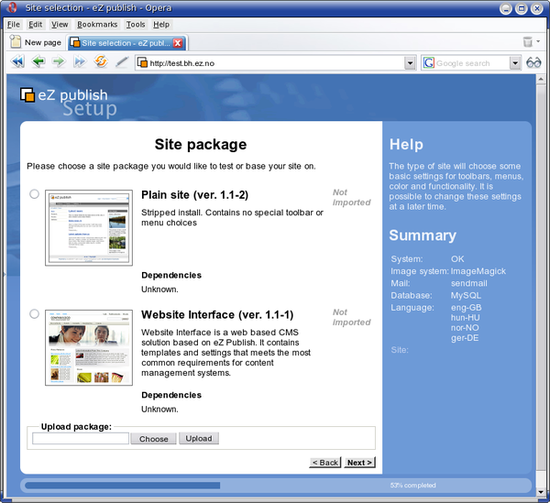
Step 7: Site selection
This step allows the user to select one of the standard site packages. These packages are intended to provide basic examples (News, Shop, Gallery, etc.) mostly for the purpose of demonstration and learning. However, it is possible to use them as a basic framework which you can extend/tweak in order to make it suitable for a specific purpose. A demo site usually contains some artwork (images), CSS code, actual content and template files. The plain type should be used when starting from scratch.
The setup wizard automatically fetches the list of available site packages from remote and internal repositories and asks the user to choose one. The default remote repository is http://packages.ez.no/ezpublish/3.9.
Note that the default repository only contains the "Plain site" and the "Website Interface" packages. Old site packages like "News site", "Shop site", "Gallery site", etc. are now located at http://packages.ez.no/ezpublish/3.9legacypackages. If you wish to use the old packages, you can do the following:
Create a file called "package.ini.append.php" in the "settings/override" directory and make sure it contains the following lines:
[RepositorySettings]
RemotePackagesIndexURL=http://packages.ez.no/ezpublish/3.9legacypackages
- Restart the setup wizard.
The wizard will automatically download the selected site package and all its dependent packages, import them to the system and display a list of successfully imported packages as shown in the following screenshot. (This step will be omitted if all these packages are already stored under internal repositories.)

The list of imported packages
All dependent packages except for the site style package will be automatically installed.
Dealing with possible problems
If the web server is not able to contact the remote repository (due to firewall rules for example), the setup wizard will display an error message at the "Site selection" step. To fix this, allow outbound connections to http://packages.ez.no in your firewall (port 80) or download the packages manually.
Outbound connections via proxy
If you allow only outbound connections via a proxy server, then you need to configure eZ Publish in the following way:
Create a file called "site.ini.append.php" in the "settings/override" directory and make sure it contains the following lines:
[ProxySettings]
ProxyServer=proxy.example.com:3128
User=myuser
Password=secret
Replace "proxy.example.com:3128" with the actual address and port number that can be used to access the web through the proxy server. If the proxy server requires authentication, you will also need to provide a valid username/password combination.
- Restart the setup wizard.
Note that CURL support must be enabled in PHP, otherwise outbound connections via proxy will not work.
Manual download of packages
If the wizard fails to connect the external packages repository, you can manually download the desired site package and all the dependent packages it requires and then upload/import them via the setup wizard. The following instructions reveal how this can be done.
- Go to the packages download page. The "Sites" section of this page contains the list of available site packages including the following information for each of them:
- Name
- Description
- Dependencies (if any)
- Download all the dependent packages required by this site package (these are listed under "Dependencies"). You can download a package by clicking on its name. The packages are downloaded as ".ezpkg" files.
- Use the package import interface located at the bottom of the page in the setup wizard to upload/import the downloaded site package (click the "Choose" button, select the downloaded ".ezpkg" file that contains the site package and click the "Upload" button). The imported site package will appear on the list.
- Upload/import all the dependent packages using the same import interface.
Note: it is also possible to download packages manually from the remote repository. The following instructions reveal how this can be done.
- Go to the packages repository, find the desired site package and download it manually. (A package is downloaded as an ".ezpkg" file.)
- Unpack the ".ezpkg" file into a temporary folder and view the "package.xml" file in order to figure out which dependent packages are required (these are listed between the <dependencies> and </dependencies> XML tags as described here). Download all the dependent packages that are required.
Additional functionality
In eZ Publish 3.7 and earlier versions, the setup wizard included one more step called "Site functionality" that allowed to select additional features that should be installed. This step is no longer used. Additional functionality can be added after the setup wizard is finished by downloading the desired packages from the "Content objects" section of the packages download page, importing the packages and installing them.
Access method

Step 8: Site access configuration
This step allows the configuration of the access method that should be used when eZ Publish receives a request. There are three options:
- URL
- Port
- Hostname
URL
When the URL access method is used, eZ Publish selects the site that should be accessed based on the contents of the URL (in particular the part that comes right after "index.php"). This is the default and most generic option. It doesn't require any additional configuration. Use this setting when installing eZ Publish for the first time.
Port
When the port access method is used, eZ Publish selects the site that should be accessed based on a port number that is specified in the URL. The port number must be appended to the hostname of the web server: "http://www.example.com:81/index.php". This option requires additional web server and firewall configuration. Use this setting only if you know what you're doing.
Hostname
When this access method is used, each site is assigned a unique hostname. For example, "www.example.com" and "admin.example.com" can be assigned to the public and the administration interface respectively. This option requires additional web and DNS server configuration. Use this setting only if you know what you're doing.
Site details

Step 9: Site details
This step allows the modification of settings related to the site that is being installed. Please note that the "User path" and "Admin path" access values depend on which access method you choose. When the port access method is used these values are port numbers. If you use the URL access method then "User path" and "Admin path" should only contain letters, digits and underscores. If the hostname access method is used then some additional symbols like dashes, dots and colons are allowed whereas underscores aren't.
The available databases will be displayed in the database dropdown menu. The "Refresh" button can be used to update the list (if a database is being created at this point). If the user has chosen Unicode setup on the "Language support" step then the database that uses UTF-8 as character set is required.
If the selected database already contains data, the "Site Details" page will reappear and ask what to do. Possible actions are:
- Leave the data and add new
- Remove existing data
- Leave the data and do nothing
- I've chosen a new database
Use the last option if another database has been chosen.
Site security

Step 10: Site administrator
This step suggests some basic modifications that should be carried out in order to secure the site being installed. The suggested security tweak protects the configuration files from unwanted access. Don't worry about this unless you're setting up a site for public use.
Please note that the administrator's username (login) is set to "admin" by default and can not be changed. If you need another username for site administrator, you can install eZ Publish, create a new administrator user, log in as this user and remove the old one.
Site registration

Step 11: Site registration
This step allows you to control whether the setup should send an information E-mail to eZ Systems or not. The information will be used internally for statistics and for improving eZ Publish. No confidential data will be transmitted and eZ Systems will not misuse or sell these details. The following information will be sent:
- System details (OS type, etc)
- The test results
- The type of database that is being used
- The name of the site
- The URL of the site
- The languages that were chosen
Finished

Step 12: Finished
The setup wizard has finished, eZ Publish is ready for use. Click on one of the links to access the various interfaces (public site, administration interface, etc.).
Please note that it is possible to restart the installation wizard after its successful finishing by specifying "CheckValidity=true" in the "settings/override/site.ini.append.php" file so that the setup wizard will be initiated when trying to access the site.
Balazs Halasy (14/01/2005 12:18 pm)
Svitlana Shatokhina (03/11/2008 3:25 pm)
Comments