The object edit interface
You can access the object edit interface from the main tabs "Content structure", "Media library" and "User accounts". This interface makes it possible to edit the actual contents of objects. In addition it allows you to manage the object's versions and preview the version that is being edited.
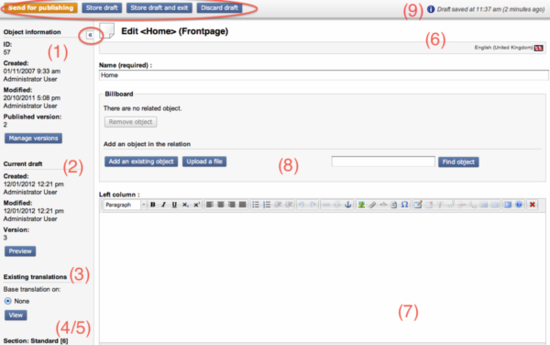
The object edit interface is also accessible from the "Setup" menu - "States". The following screenshot shows what this interface typically looks like.
The "Object edit interface
The object edit interface usually consists of 8 parts:
- Object information (1)
- Current draft (2)
- Translate from (3)
- Section (4)
- States (5)
- The main edit window (6)
- Related objects (7)
- Only when "Upload an image to a related object" is activated (8)
- Status of autosave if enabled (9)
Notes:
- As of 4.6 you were able to upload an image to a related object (8). When this functionality is activated you will get a screen as shown under "Upload an image to a related object".
- As of 4.7 you have the opportunity to hide the left menu, see circle to the left above.
- From 4.7 onwards the icon bar with the commands for publishing and storing will always stay on top of your page, so that it will always be visible for you when editing and scrolling.
- As of 4.7 you will not be able to activate the full-screen view.
The "Object information" window
The "Object information" window reveals information about the object that is being edited. The following image shows how this window looks like.

The "Object information" window
The screenshot reveals that the ID of the object which is being edited is 172. The object was initially created on the Febuary 23, 2010 by Administrator User at 10:33 AM. The object was last modified by the same user on March 5, 2010 at 11:09 PM. The object exists in several versions and it is the 1st version that is the currently published version. In other words, it is the 1st version that will be displayed when the object is being viewed.
The "Manage versions" button brings up the version interface which makes it possible to administer the versions of the object that is being edited.
The "Current draft" window
The "Current draft" window reveals information about the version that is currently being edited. The following image shows what this window looks like.
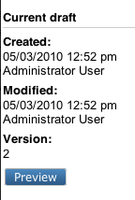
The current draft window
Every time an object is created or edited, eZ Publish will automatically create a new draft. A draft only contains the language that is being edited by the user. If a new object is being created or new translation is being added to an existing object then the draft will be empty. However, if an existing language/translation of an object is edited then the system will create a draft which contains this translation copied from the last published version.
This window simply reveals information about when the draft (which is being edited) was originally created, who created it and when it was last modified (stored). In addition, the window also reveals the actual version number of the draft.
Please note that the version number of the current draft differs from the version number of the published version (shown in the "Object information" window). The reason for this is because eZ Publish does not allow the editing of published and archived versions. It only allows you to edit drafts. When an object is edited, a new draft will be created and it is this draft that you will be able to edit.
The "View" button brings up the view interface which can be used to generate a preview of the content that is being edited without having to publish it. When the "Store and exit" button is clicked, the system will store the draft and exit the object edit interface. The draft will be available in the "My drafts" list located under the "Dashboard" tab. It can be re-edited at any time.
The "Translate from" window
The "Translate from" window reveals information about the existing languages and allows to select the language which the edited translation should be based on. The following image shows how this window looks like for an object that exists in the English and Norwegian languages.

The "Translate from" window
If the user selects a language using the radio buttons located in this window and clicks the "Translate" button then the main edit window will be switched to a special "translator mode" in order to make it easier to translate an object from the selected existing language.
The "translator" mode
The main edit window can be switched to a special "translator mode" so that the actual content in the selected existing language will be displayed above all the attribute fields. This makes it easier to translate an object from an existing language into a new one. The following image shows what this window looks like when a page is being translated.
The "translation mode" widow
The "Section" window
By means of a drop down list you are able to select the section to which the object should belong. Possible sections are: Design, Media, Restricted, Setup, Standard, Users. Press "Set" to confirm your selection.

The "Section" window
The "States" window
This window allows you to define object states for the object. Press "Set" to confirm your selection.

The "States" window
The "Main edit" window
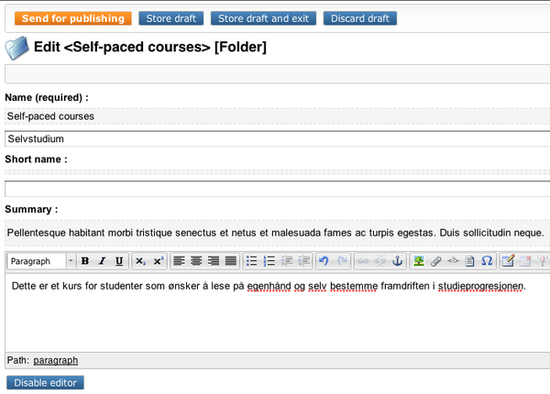
The main edit window is where you can modify the contents of the different attributes that make up the object which is being edited. For example, if a news article is being edited, this window will most likely allow you to change the title of the article, the intro text and the body. The attributes will be displayed in the same order as they were set up when the class (which defines the actual data structure) was created. Required fields will have additional text "required" in the label. The following image shows how this window looks like when a documentation page is being edited.
Note: From 4.7 onwards the icon bar with the commands for publishing and storing will always stay on top of your page, so that it will always be visible for you when editing and scrolling.

The "main edit" window
In this case, there are 3 attributes that can be edited: "Title", "Body" and "Show children".
The "Send for publishing" button will attempt to validate the contents of the attributes and send the draft for publishing. If there are problems (for example invalid or missing data) then the system will indicate this using a yellow frame over the main edit window. If everything is okay, the draft will become the current/published version for the object and the previously published version will become archived. Since the draft only contains data for one language, the system will copy other languages from the last published version of this object to the draft when publishing it.
The "Store draft" and the "Store draft and exit" button make it possible to store the information that has been entered. This button is particularly useful when you're working on something and want to save your work from time to time. In addition, since eZ Publish will attempt to validate the input, this button can also be used to verify that the inputted data is correct according to the definitions that were set up when the class (the data structure definition) was created. Please note that the published version of the object will not change.
The "Discard draft" button makes it possible to get rid of the draft that is currently being edited. The draft will not be validated or stored, it will simply be thrown away. The "Show children" check-box can be used to show the child objects in the published version.
The disable editor buttons means that you can close the editor panes if you don't need them.
Note: If you have eZ Comments system installed you will get two check-boxes towards the bottom of the screen.

With these you can manage commenting on this article. Please see the eZ Comments system for more information on this functionality.
The "Related objects" window
In the related objects window you will find all the objects that are used on this content page, images that you use in an article will typically be stored here. You can add existing objects to the article, upload new objects or remove objects by selecting them and pressing "Remove selected".

The "Related objects" window
Geir Arne Waaler (12/01/2012 1:59 pm)
André R. (21/02/2012 9:30 am)
Comments
There are no comments.