User defined Object States
|
This part of the 4.x documentation is for eZ Publish 4.0, only reference section is common for all eZ Publish 4.x versions as well as eZ Publish 5.x "LegacyStack", please select the version you are using for the most up to date documentation! |
The introduction of freely definable object states, possibly grouped in object state collections and coupled to the role/policy system of eZ Publish, enables a wide range of applications including typical workflow processes. By default eZ Publish has only one content object state group: "Lock" with object states "Locked" and "Not locked". But by creating freely definable object states groups with their own set of object states, the possibilities of the application can be more specifically tailored to user needs.
How does it work?
Object states are typically used in workflows and other workflow-like processes. It's useful to note that although they are used in workflow processes, not all workflows use object states, nor do object states employ the eZ Publish workflow engine or the workflow system themselves. In this article the term "workflow" should generally be understood as the succession of steps rather than an eZ Publish concept.
A workflow defines an organized sequence of actions that will be executed while the workflow is running. A simple example of a workflow could be a newly written article (object) that is sent for approval to an editor. Since by default eZ Publish only has one content object state group, "Lock", the status of this article or object can only change from unlocked to locked during this workflow process. And once an object has been locked and submitted into such a workflow process, the object remains locked until it is either rejected or accepted. So during the time between submitting an object and its approval no further editing or correcting can be done.
But the possibilities of such workflow processes can be broadened simply through the use of freely defined object states. This allows for more states to be added, thus proving more steps in the process. By attaching policies to each state you are able to control who can do what to an object while it is in a specific state.
Because the states of an object changes throughout the work process, the transition between the states of objects must also be governed through specifically assigned policies to define who is allowed to change the state. Simply put: policies must be assigned to both the states individually, as to each state change. Keep in mind that an object can have multiple object states, but can only have one object state per object state group. Learn more about the use of object states in an editorial workflow...
Limitations
Some limitations of this system must be taken in consideration. First of all, freely defined object states are assigned on object level, therefor they operate on published versions only, not on translations or drafts. The second limitation is that the roles and policies, that are at the heart of this system, are not yet elaborate enough to cover all possibilities.
Not so much a limitation as it is an observation, that, as mentioned before, object states can be used in workflow processes, but not all workflows use object states.
Why not sections?
Sections are also often used to imitate workflow object states. Although the use of sections also makes it possible to limit and control access to content through roles and policies, it isn't capable of defining policies on state changes. Whereas user definable object states can grant policies to both the states themselves as to the transitions between states. This being said sections are still used for secure sites, where for example anonymous users are only allowed to see the default view.
How to create Object States
- To create custom object states you must first create a Content Object States Group to place them in. This can be done in the Administration Interface, under the Setup-tab.
- Click on the "States"-link in the left menu. Here you'll be able to create a new Content Object States Group.
- In the newly created Content Object State Group you can then create object states matching the different phases of your work process by clicking "Create new". The first state in the group will be applied by default to all newly created objects.
- Next you must give the correct rights to each user or user group so they can do their part of the task and only their part, before handing over the content to the next group or user:
- Roles and policies can be created or modified through the User Accounts-tab. In the left menu, under "Access control" you'll find the "Roles and Policies"- link. Note that you can also be redirected to this location via the "Roles and Policies" link in the Setup-tab.
- For each usergroup associated to this work process, specific roles and policies must be defined to limit their access and contribution to their specific tasks.
- Furthermore roles must be assigned to control the state transitions between each phase of the workflow.
- Now that only authorized users can modify the state of an object and push it through the workflow, a handover-channel should be created between the different contributors. This implies that user(group)s should be notified when an object is ready for them to fulfill their task. However, this feature is not yet included by default in eZ Publish 4.1, but soon will be. For now this must be done manually by sending the URL of the object to the next user(group) in line.
An example
It can be useful to implement a private waste bin and for this object states can easily be defined. In a private waste bin an owner can place articles without deleting them permanently, but still preventing others to read or edit them. The simplicity of removing an article out of the personal waste bin and making it visible for others is an added advantage. In this implementation an object also retains its node location(s).
How to create a personal waste bin step-by-step
To create a private waste bin through the Administration Interface, navigate to the Setup-tab. In the left menu, click on the the "States"-link. Here you will see a list of already existing content object state groups (by default you'll only find "Lock") and you will be able to create a new content object state group:

For this example a group "Private Wastebin" was created, which includes two object states: "Viewable Article" and "In Private Wastebin". Obviously the first allows an object to be viewed by all users, whereas the latter only allows the owner to view and edit the object. Note that the first state will always by applied as default state.

Providing the correct rights to the owner is the next step. This must be done via the "Roles and Policies"-link, which can be accessed both under the left menu "Access control" in the "User Accounts"-tab, as through the "Roles and Policies"-link in the "Setup"-tab.Beneath the list of roles you can create a new role. The role "Owner" is added and includes policies that only allow the owner of an object to edit and read the content of an article when it has the object state "In Private Wastebin". Furthermore the owner is given the sole right to control the state transitions.Next all user(group)s are assigned to the role "Owner".

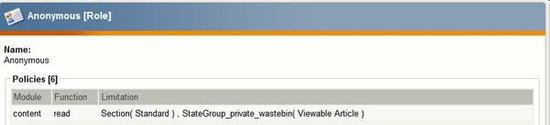
Finally the policies in the Anonymous role must also be altered in order to prevent anonymous users from viewing articles in "In Private Wastebin". In the policy regarding reading content the limitation of "State_Group_Private_Wastebin" is set to "viewable article".
Use of private waste bin
After an article has been created and sent for publishing in the User Interface, the owner will be able to define the object state.

This can also be done with an already published article:

In the Administrator Interface, the state can be altered when you navigate to the "Content Structure"-tab. When viewing an article here, make sure the "state assignment widget" at the top of the page is enabled. If so, you'll be able to define the object state.

For another example of the use of object states, please read "eZ Publish Knowledge Series: Editorial workflow with Object States".
Ester Heylen (30/11/2009 10:12 am)
Ricardo Correia (17/04/2013 3:44 pm)
Comments
There are no comments.