Publishing at multiple locations
The content structure of eZ Publish makes it possible to publish the same object at different locations in the tree. This means that you can for example have the same news article appear at different places on your site. Please note that this feature only works with single nodes. If you add a new location for a folder that contains several news articles, the system will only make a new location for the folder itself but not the articles.
You can either add a new location to an object that has already been published or you can publish an object at multiple locations at the same time. Please note that the first approach requires that the information has already been published. The second approach does not have this requirement because you can control the locations where the information should be published from the edit interface. The following text explains both approaches.
Adding a new location to a published object
This approach allows you to publish an already published object at a new location in the tree. For example, if you have a news article that you also wish to make available somewhere else on the site, you can simply add a new location (a node) to the object that contains the article. For this to work, you'll need to enable the "Locations" window. This can be done by clicking on the "Locations" button in the toolbar located in the top/middle of the main area. The following image shows what this window looks like.

The following text explains how you can add new locations.
- Navigate the node tree until you find the node (page) that you wish to make available at an alternate location. Make sure that you're actually looking at the node.
- Click the "Add locations" button in the "Locations" window. The system will bring up the browse interface.
- Use the browse interface to select the alternate location(s) where the object should be published.
- Click OK - the object will be published at the selected location(s) and thus it should appear at different locations in the tree.
Controlling the locations before publishing
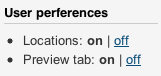
First of all, you'll need to enable the "Locations" window. This can be done by clicking the "On" link for "Locations" in the "User preferences" settings in the collapsible right menu.
When done, the object edit interface will contain an additional window at the bottom. This window will allow you to control where the object that is being edited should be published. The following image shows what this window looks like.

You can use this window to control where the object should be published and how it should be published (sorting settings, visibility status and so on.).
In order to avoid possible conflicts when an object is edited by multiple users at the same time, the system will no longer allow to change locations via the object edit interface except the first object's version. This means that you can control locations when creating a new object but not when editing an existing one. However, it is still possible to modify location(s) of existing objects using the locations window (described in the "Content structure" tab) that is displayed when viewing an object.
Balazs Halasy (04/03/2010 3:34 pm)
Geir Arne Waaler (07/09/2010 8:41 am)
Comments
There are no comments.