Managing User Accounts
This section explains how to create and manage user accounts. Users must have an account in order to access the Website Interface. User accounts are created in the Administration Interface. Each user account has an associated user profile that contains personal details about the user. Individual users can manage the profile details associated with their account via the Website Interface (by clicking the My profile link). In most cases, the site administrator will create accounts for each user who has the right to add and edit content. (“Guest” users, who have only limited content-creation rights such as the ability to post to forums or add comments to pages, can create their own accounts). Therefore, this section is only applicable to people who are responsible for site administration.
Creating a User Account
Before you can start adding content to your web site, you need to create a user account that has the rights of an “editor”.
Logging in to the Administration Interface
The Administration Interface is used to create user accounts. To access the Administration Interface, use the URL http://example.com/ezwebin_site_admin, where“example.com” is the domain name of your site. Log in with the default user name “admin”and the password that you specified for the “admin” account during the installation process. You can also access the Administration Interface from the front-end of your site.Select the Login link (located by default in the area at the top right of the each page),specify the administrator user name and password and check Log in to the administration interface of eZ publish.
Creating a New User Account
In the Administration Interface, click the User accounts button in the horizontal menu bar,then click the Editors link in the left navigation panel.

Creating Editor Account
To create a new account in the Editor group:
In the Sub Items panel, select User from the drop-down list box.
- Click on the "Create New" button.
- Enter the information about the user.
- Click on the "Send for publishing" button.
The new user account is a member of the Editor group and automatically gets the privileges associated with that group. The user will be able to change some of thisinformation (such as his name, password and email address) via the Website Interface.
User Groups, Roles and Policies
The item Editors in the left navigation menu represents a user group. Each user group is associated with a set of user policies that determine the privileges of users assigned to the group. When you create a new user account, it automatically inherits all the user rights associated with the group under which it was created. To view or edit the policies assigned to a group, click Roles and policies in the Access control panel on the left side of the screen. All of the configured roles are displayed in the main area of the Administration Interface. A role is a container for one or more policies. Roles can be assigned to groups or to individual user accounts.
This combination of users, groups, roles and policies is referred to as “access control”. These can be highly customized via the Administration Interface. To find out more, refer to the online eZ Publish manual: Access Control.
The pre-configured user groups are:
| User Group | Description |
|---|---|
| Administrator Users |
Superusers. A superuser has access to all functionality in all areas of the website. The administration account for the site should never be used for day-to-day tasks. Instead, it should only be used when you need to access advanced functionality (as described in the relevant sections of this manual). |
| Editors |
Content editors. These users can add, modify and delete content. |
| Partners |
Visitors. These users can access areas of the site that are hidden from users who are members of groups with less privileges. |
| Members |
Anonymous users who have created their own account. Self-registered users are automatically assigned to the Members group. They can create topics and replies in forums, and add comments whenever the comment functionality is enabled. They can also modify personal account information (such as email address and photo). |
| Anonymous Users |
Visitors that have not logged in. They can read all the site content that is not restricted to registered users. |
Removing a User Account
|
/!\ WARNING : delete a user account can lead to serious malfunctions. |
Be cautious considering deleting a user account. In most cases, it is better to disable a user account than to delete a user account.
Besides, be aware that it won't be possible to send Users to Trash bin for later restore.
Once you delete a user, it's permanently removed from the system.
Disabling a user account prevents the user from logging in and does not remove the user's association with the user's content. Deleting the account destroys the link between the user and the user's content.
When you delete a user account, the “author” attribute is removed from content posted by the user. While the content itself is not deleted, it is no longer possible to know who posted it.
If you delete a user who has not added any content, there will not be any consequences from the deletion.
Disabling a User Account
To disable a User Account:
- Log in to the Administration Interface
- Click on the User Accounts tab
- Click on the user account you want to disable
- Click on "Configure User Account Settings"
- Check the "Enable User Account" checkbox and click on the OK button
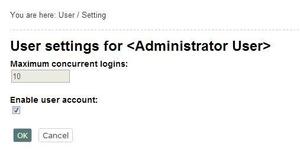
User Account Settings
The account is now disabled, and the user cannot log in. To enable the account again, simply check the "Enable User Account" checkbox and save the changes.
Deleting a User Account
To delete a User Account:
- Log in to the Administration Interface
- Click on the User Accounts button in the horizontal manu bar
- Click on the user account you want to delete
- Click on the Remove button
- Confirm the deletion by clicking on the OK button
The user account is now permanently deleted.
Andrea Melo (13/12/2012 3:20 pm)
Sarah Haïm-Lubczanski (27/06/2014 2:33 pm)
Comments
There are no comments.