Lightbox
A lightbox is best compared with a container, in which you can place other items such as content objects, content nodes or even users information and objects from external systems. It is a user related system, where each user can create lightboxes, add items to them and share with others. By sharing a lightbox users are able to discuss its contents with other users. Users are also able to have several lightboxes at the same time.All types of content can be added to a lightbox. On the right hand side of any Blog, File, Milestones,... page a user will see the following lightbox icon:
Clicking on this will open the lightbox dialog, where you can view and adjust the current lightbox.
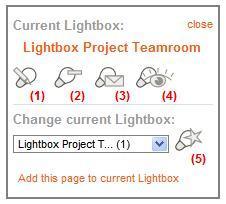
This dialog contains the following buttons and links:
- Use button (1) to edit the current lightbox. You will be redirected to the Edit Lightbox page described below.
- Use button (2) to delete the current lightbox.
- Use button (3) to send the current lightbox by email. This will allow you to grant other users access to your lightbox. The Send lightbox page is described below.
- Use button (4) to view the contents of the current lightbox. You will be redirected to the Lightbox page (described below)
- Use button (5) to create a new lightbox. You will be redirected to the Create new Lightbox page (described below)
- You are also able to change the current lightbox by selecting one from the drop-down list or creating a new one with button (5). In the drop-down list the number between () after the lightbox name is the amount of objects the lightbox contains.
- To add the page you are on to the lightbox, click the Add this page to current lightbox link.
The following screenshot shows the Lightbox page for our example lightbox "Lightbox Project Teamroom":

On the left side the following links and lists are displayed:
- My lightboxes (1) displays all lightboxes you own. Click on their names to view their designated lightbox page.
- Other lightboxes (2) displays all lightboxes you have access to. Click on their names to view their designated lightbox page
- Granted Users (3) displays all users who have access to this lightbox. Their name is accompanied by a (v) for "view", (e) for "edit" or (g) for "grant" depending on their level of permission.
- Create new Lightbox (4) contains a link that enables you to create a new lightbox. This link will redirect you to the Create new Lightbox page, shown in the screenshot below, where you can choose whether or not to use this new lightbox as current lightbox:

The Lightbox page also shows the full view of the items in the lightbox and offers extended functionality such as moving items from one lightbox to another. By clicking on the title of the asset (10) you will be redirected to the page that contains the assets contents. The date on which the asset was added to the lightbox (11) is shown next to the title. To move an asset from this lightbox to another one, select the destination lightbox from the drop-down-list (14) and use the Move button (13).
The extended functionality also includes the option to edit your lightbox with the Edit button (5). You will be redirected to the Edit Lightbox page where you can alter the lightbox name, delete users or change their access rights, as shown in the following screenshot. Don't forget to store the changes.

From the Lightbox page it is also possible to delete y
our lightbox with the Delete button (6). The entire lightbox will then be removed. However if you wish to only delete the lightbox assets and not the lightbox itself, use the Empty button (7). In order to delete only one specific asset from the lightbox use the button in the asset list (12). To grant other users access to the lightbox press the Send button (8). You will then be redirected to the page displayed in the next screenshot where you can add the email address of the receiver, the subject, a message and the level of access permitted ("View", "Edit" and "Grant". The latter means the recipient is also allowed to send the lightbox to others).

Because the email address must be known, press the Find User button to match the email address to a user. Next you will be able to verify if this is in fact the correct user, if so use the Send lightbox button the grant access, if not use the Go Back button.

Use the Go Back button (9) to leave the Lightbox page and return to the previous page.
On the Teamroom and the User page the a compact view of the lightbox including its content will be displayed in the widget "Lightbox selection", as shown here:

Select the lightbox you wish to view and from the drop-down list ("current" will be added to remind you which lightbox is currently in use). The assets are listed and can be used as links to view the page that contains the "lightboxed" content. In this context the lightbox can be considered similar to a bookmarking system.
Ester Heylen (16/03/2010 9:44 am)
Ester Heylen (20/04/2010 8:44 am)
Comments
There are no comments.