Getting started
After installation, the Online Editor becomes an integrated part of your administration interface. It will appear every time you edit text that is stored in an XML field. By "XML field" we mean an attribute/field that is using the "XML block" datatype. (Note that it is the only datatype that allows you to store multiple lines of formatted text.) For example, a "Folder" object has two XML fields/blocks: "Summary" and "Description".
Let's open a folder object for editing and take a closer look at how the Online Editor works. Log in to the administration interface. You should see the "Content structure" tree on the left. The nodes containing folder objects are displayed using an icon that resembles the following image:
The "Folder" icon
You can easily view or edit an object by left-clicking on the folder icon of its node in the "Content structure" tree and selecting either the "View" or the "Edit" item from the context menu. You can also click on the node itself, then you will be directed to the “view” interface. The following screenshot shows a context menu for "Getting Started" (this node references a folder object). Note that some items will be added to your context menu depending on your extensions (this is the case for eZ Flow and eZ Find)

Let's take a closer look at the "Getting Started" node in the "Content structure" tree. In our example the identification number for this node is 3.
Note that these screenshots refer to a folder object, so if you want to follow these examples make sure you select a node which references a folder object.

The screenshot above shows how the system will display the contents of the selected node. Click the "Edit" button in order to edit the contents of the object that is encapsulated by the selected node. You will be taken to the edit interface as shown in the screenshot below.

The screenshot shows a part of the edit interface which allows you to edit the actual contents of an object. Take a closer look at the two XML fields "Summary" and "Description". When the Online Editor is enabled, these fields would have special interfaces attached to them. Above the text-areas you should be able to see the OE toolbar containing a lot of buttons. Some of the buttons will open dialog boxes when clicked. The OE status bar is located under the text area. These components are described in the upcoming sections.
XML fields store your text together with the information regarding internal structure (headings, tables, lists etc.) in the form of XML code. The OE interprets this XML code and creates a structured text in accordance with XML tags instructions. In other words, the Online Editor converts the XML code into a visual representation of the same data. For example, images will be shown as images, tables will be shown as tables, and so on. Technically, this is done by converting the XML tags instructions into valid XHTML 1.0 code, which is then interpreted by the user's browser.
The OE formats your text at a logical level. In other words, you can create links/headings/tables/lists etc., but you can not specify their colors, justification and other layout-related issues directly. (You should use classes, templates and stylesheets for these purposes.)
Disabling the Online Editor
Sometimes you may need to view or edit the actual XML code instead of using the interpreted format. This can be done by clicking the "Disable editor" button, which will turn off the Online Editor for all XML blocks/fields.

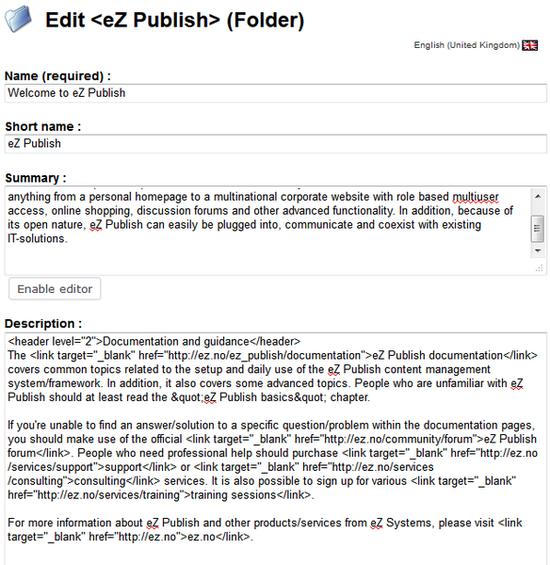
When the Online Editor is disabled, you will be able to view or edit the XML code directly (see the screenshot below). Note that the system does not display the actual XML code that is stored in the database; only a simplified version is shown. Lines and non-classified paragraphs are displayed in a natural way (without tags) for the purpose of convenience. To start a new line, press "Shift" +"Enter". To start a new paragraph, press the "Enter" key.
The screenshot above shows the appearance of XML fields when the OE is disabled. You can turn it back on by clicking the "Enable editor" button located under an XML field.
Svitlana Shatokhina (08/12/2005 9:29 am)
Ricardo Correia (10/01/2013 4:54 pm)


Comments
There are no comments.